SOCA
Community Lab
made for School of Creative Arts (SOCA) at
University of the Fraser Valley
#UI/UX design #website design
Roles
I was the following roles designing this app:
I was the following roles designing this app:
- User Experience (UX) Designer
- Interaction (IxD) Designer
- User Interface (UI) Designer
- Visual Designer
- Project Manager
Deliverables
Interaction Design:
High-fidelity interactive prototypes for key tasks on desktop website
UX/UI Design:
Interaction Design:
High-fidelity interactive prototypes for key tasks on desktop website
UX/UI Design:
- Work Breakdown Structure
- Competitive analysis (SWOT analysis)
- User surveys and one-on-one interviews
- Personas
- Research data points
- User journeys and task flows
- Affinity Diagramming
- Jobs to be done
- Experience principles
- Mental Model
- Site map
- Low-fidelity wireframes
- High-fidelity mockups and prototypes
- Design system and UI kit
- Usability tests and findings
- Case study
Project Specifications
Duration:
September 2022 - May 2023 (6 months)
Tools:
Duration:
September 2022 - May 2023 (6 months)
Tools:
- Miro
- Photoshop
- Illustrator
- Adobe XD
- Figma
video case study
︎(scroll down for more) (scroll down for more)︎
Overview
As a recent graduate, I'm intimately familiar with the challenges of securing meaningful employment. My journey into the professional world began with the discovery of the SOCA Community Lab at the University of the Fraser Valley. This dynamic platform serves as a vital link between ambitious university students and forward-thinking community partners.
For students, it unlocks valuable paid work opportunities, offering hands-on, real-world experiences that pave the way for success. Meanwhile, it affords esteemed partners a seamless gateway to access a pool of exceptionally talented creatives with just a few clicks.
Seeing the incredible possibilities that this platform held, I dived into in-depth research to figure out where we could make it even better and more innovative. My deep passion for creating a system that's stronger and more efficient drove me to jump at the chance to improve the SOCA Community Lab, making it a more rewarding experience for both students and partners.
Design process
︎︎︎UX
1.
Discover
Searching for pain
We are always looking for little signals: the annoying, the frustrating, the could-be-better.
- Competitive analysis (SWOT analysis)
- Research focus and script
- Target audience
Discover
Searching for pain
We are always looking for little signals: the annoying, the frustrating, the could-be-better.
- Competitive analysis (SWOT analysis)
- Research focus and script
- Target audience
2.
Experience
Living that pain
Once we discover a problem, we embrace it. This involves ditching the computer and talking one-on-one.
- User surveys
- One-on-one interviews
Experience
Living that pain
Once we discover a problem, we embrace it. This involves ditching the computer and talking one-on-one.
- User surveys
- One-on-one interviews
3.
Understand
Connecting the dots
We gather data to pinpoint the problem's exact what, when, where, how, and why.
- Archetype
- Personas
- Research data point
- User experience map
- User journeys and task flows
- Affinity diagramming
Understand
Connecting the dots
We gather data to pinpoint the problem's exact what, when, where, how, and why.
- Archetype
- Personas
- Research data point
- User experience map
- User journeys and task flows
- Affinity diagramming
4.
Explore
Next steps
Armed with insights and data, we start to explore solutions that'll make the experience better.
- Content structure
- Jobs to be done
- Experience principles
- Mental Model
- Site map
Explore
Next steps
Armed with insights and data, we start to explore solutions that'll make the experience better.
- Content structure
- Jobs to be done
- Experience principles
- Mental Model
- Site map
︎︎︎UI
1.
Sketches
Sketches
2.
Wireframes
Wireframes
3.
Component design
Component design
4.
User flows and Task flows
User flows and Task flows
5.
High fidelity designs
High fidelity designs
6.
Prototype
Prototype
︎ Getting Closer to User-Centered Design ︎
UX Design
Step 1:
Discover
- Competitive analysis (SWOT analysis)
- Research focus and script
- Target audience
During the “Discover phase”, I delve into a realm filled with tasks and objectives, all geared toward unraveling the challenge at hand and grasping the unique user requirements. Picture it as akin to being a detective, except I'm not solving crimes; I'm deciphering user experiences. I employ an array of methods to gather invaluable information, insights, and data that offer profound insights into the problem we're addressing.
Yet, it's not just about the grand revelations; it's about keeping a keen eye on the finer details. I stay attuned to those subtle user signals—the things that bother them, moments of frustration, and areas that could be smoother. These signals are akin to precious gems, guiding us toward making meaningful improvements. Essentially, the Discover stage embodies an exploratory journey where I transform information and insights into a crystal-clear comprehension of user needs, laying the groundwork for crafting solutions that genuinely resonate and make a substantial impact.


Step 2:
Experience
- User surveys
- One-on-one interviews
The user interviews helped me to...
Experience
- User surveys
- One-on-one interviews
The user interviews helped me to...
- In-Depth Understanding of User Needs:
User interviews provide designers with an opportunity to delve deep into the psyche of their target audience. They offer a means to comprehensively understand the nuanced needs, aspirations, and challenges that users face when interacting with our platform. Through open, candid conversations, I uncovered insights that go beyond mere surface-level observations, paving the way for solutions that truly resonate with users.
- Empathy and User-Centricity:
Engaging in user interviews fosters empathy among designers. By listening to users' stories, frustrations, and aspirations, I placed myselves in the shoes of their audience. This empathy forms the bedrock of user-centric design, where every decision is driven by a genuine desire to enhance the user's experience and address their unique pain points.
- Feedback on Existing Solutions:
Since SOCA Community Lab is already in use, user interviews offer a means to gather user feedback. This feedback provides insights into what is working well and what isn't, enabling designers to address pain points and make improvements in a targeted manner.
Step 3:
Understand
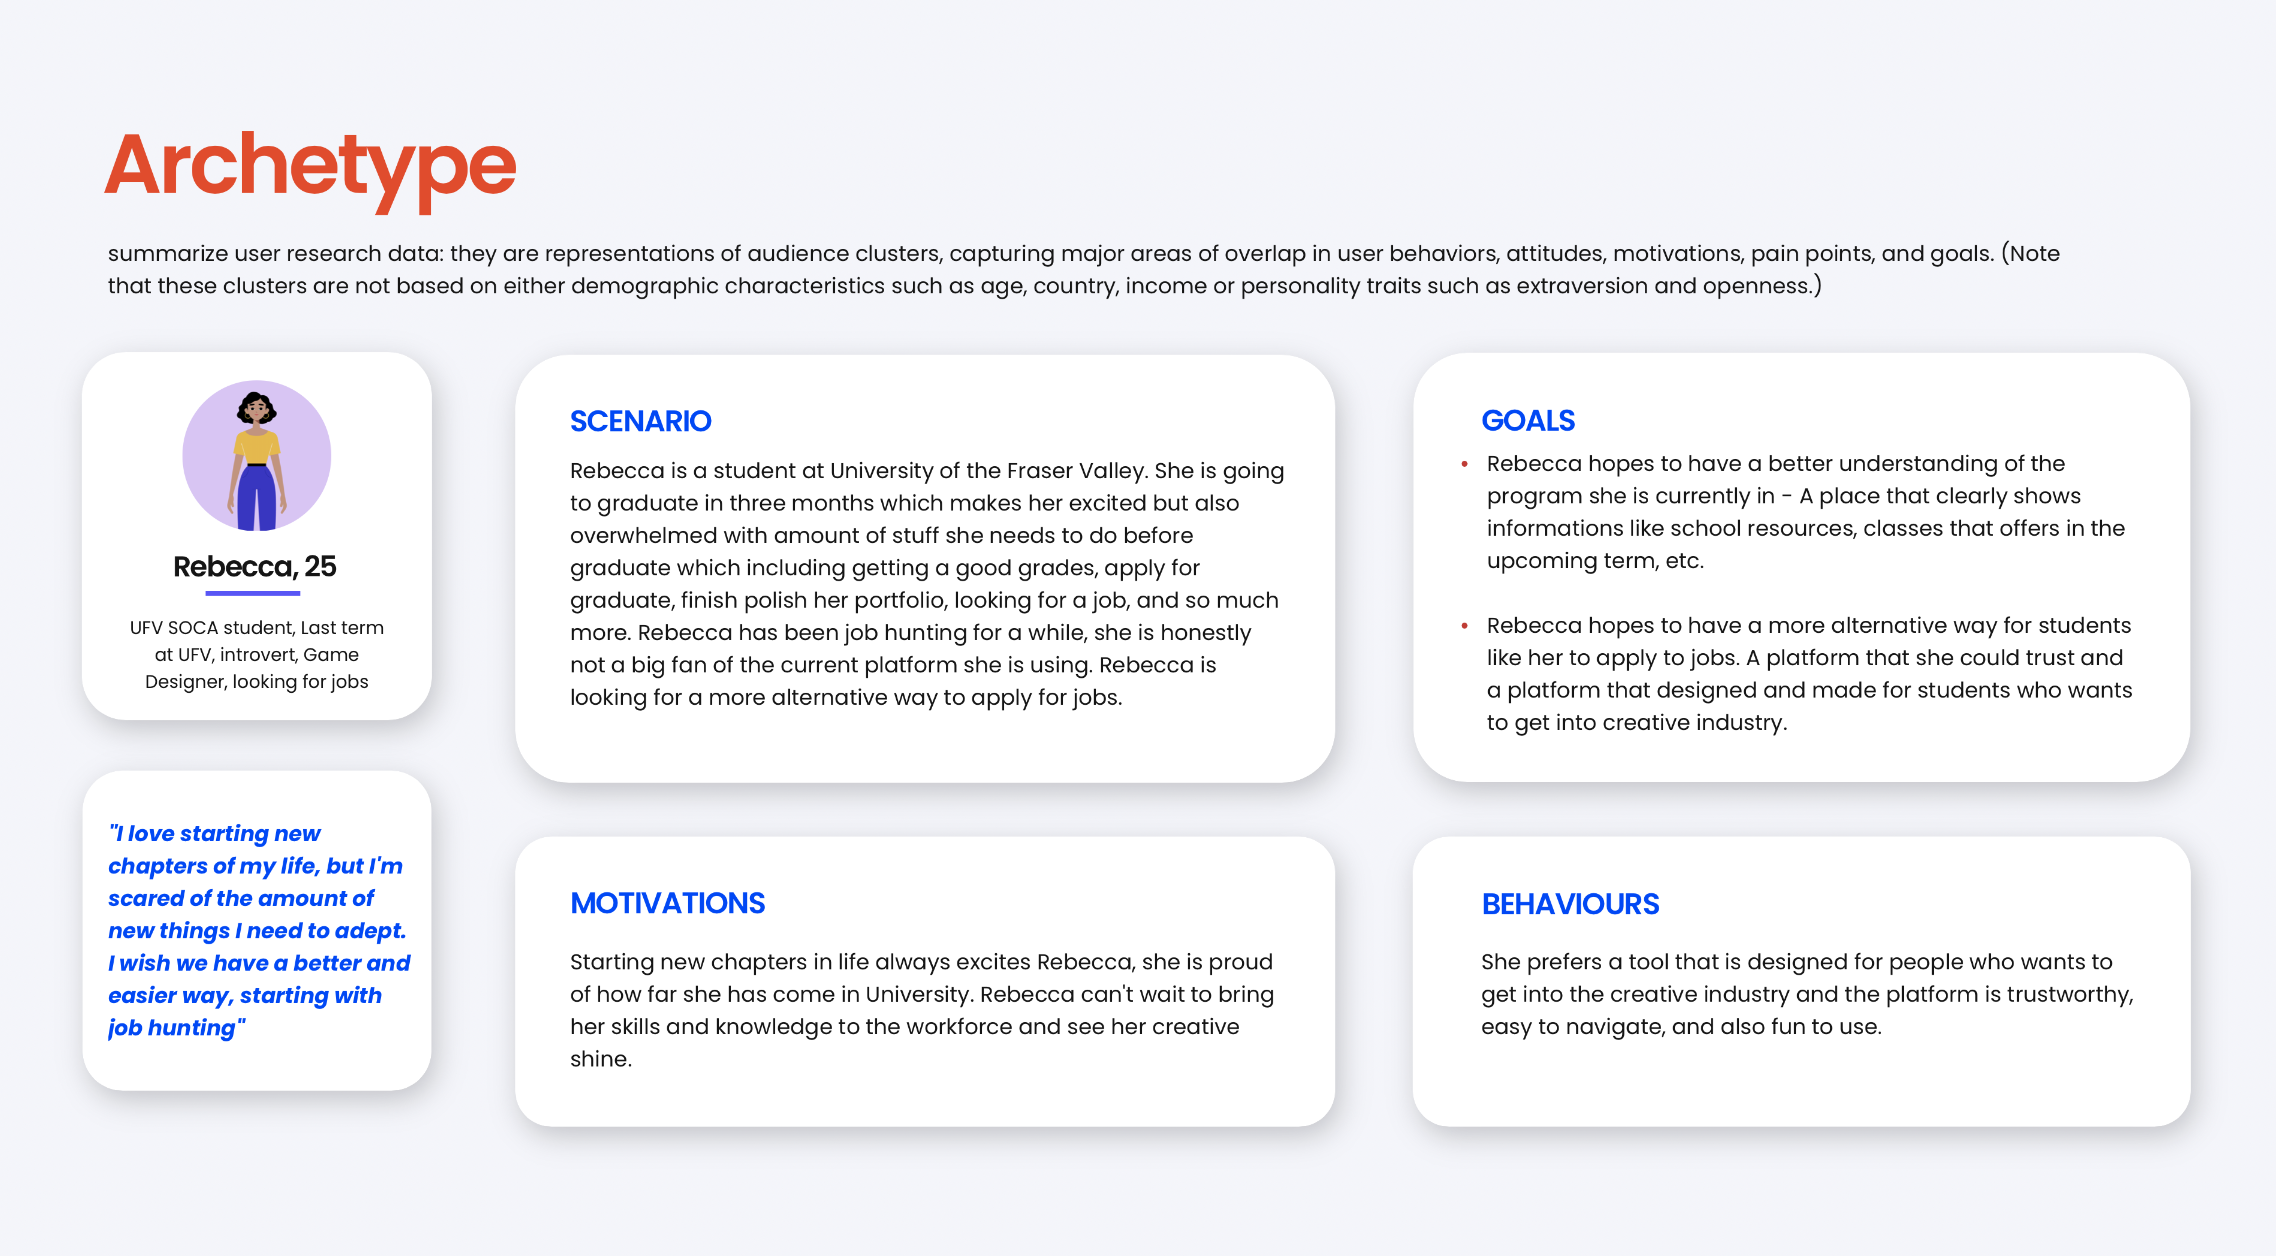
- Archetype
- Personas
- Research data point
- User experience map
- User journeys and task flows
- Affinity diagramming
This is where we gather data to pinpoint the problem's exact what, when, where, how, and why. I found out that ...
Understand
- Archetype
- Personas
- Research data point
- User experience map
- User journeys and task flows
- Affinity diagramming
This is where we gather data to pinpoint the problem's exact what, when, where, how, and why. I found out that ...
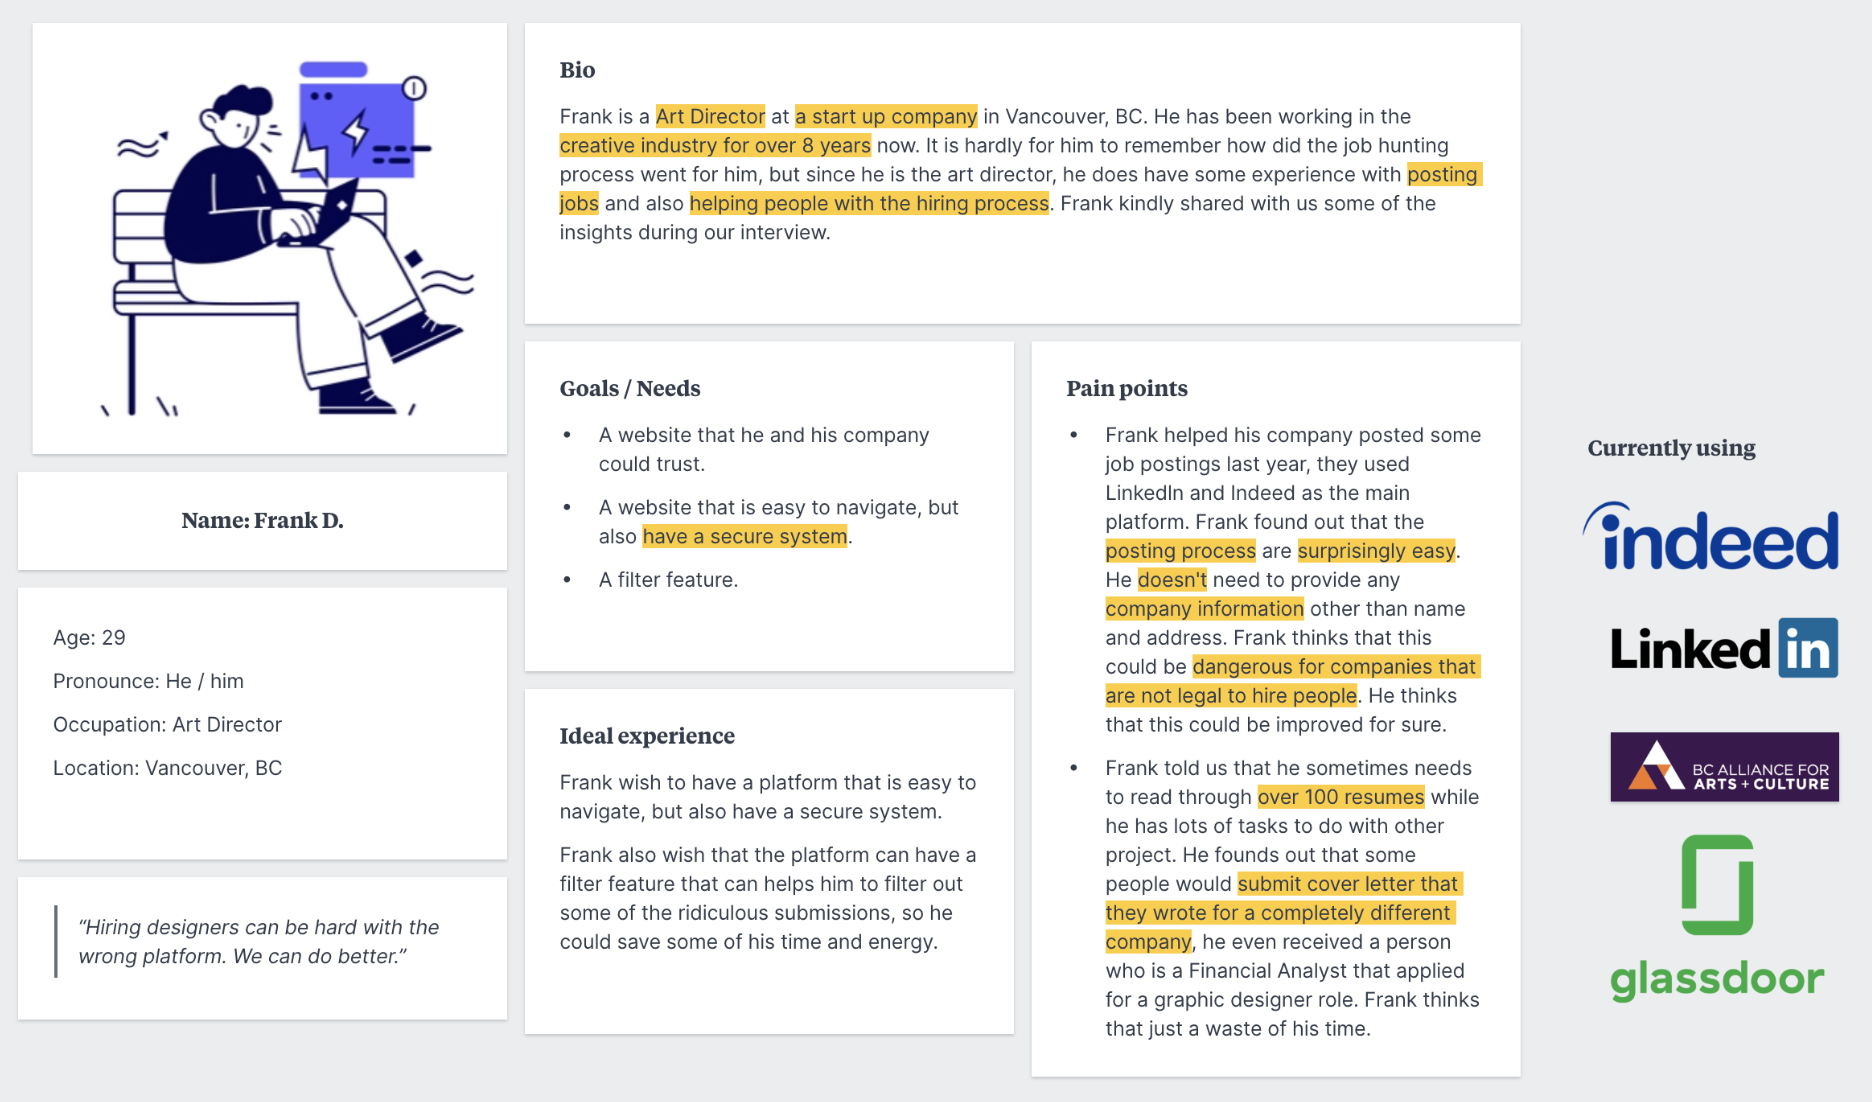
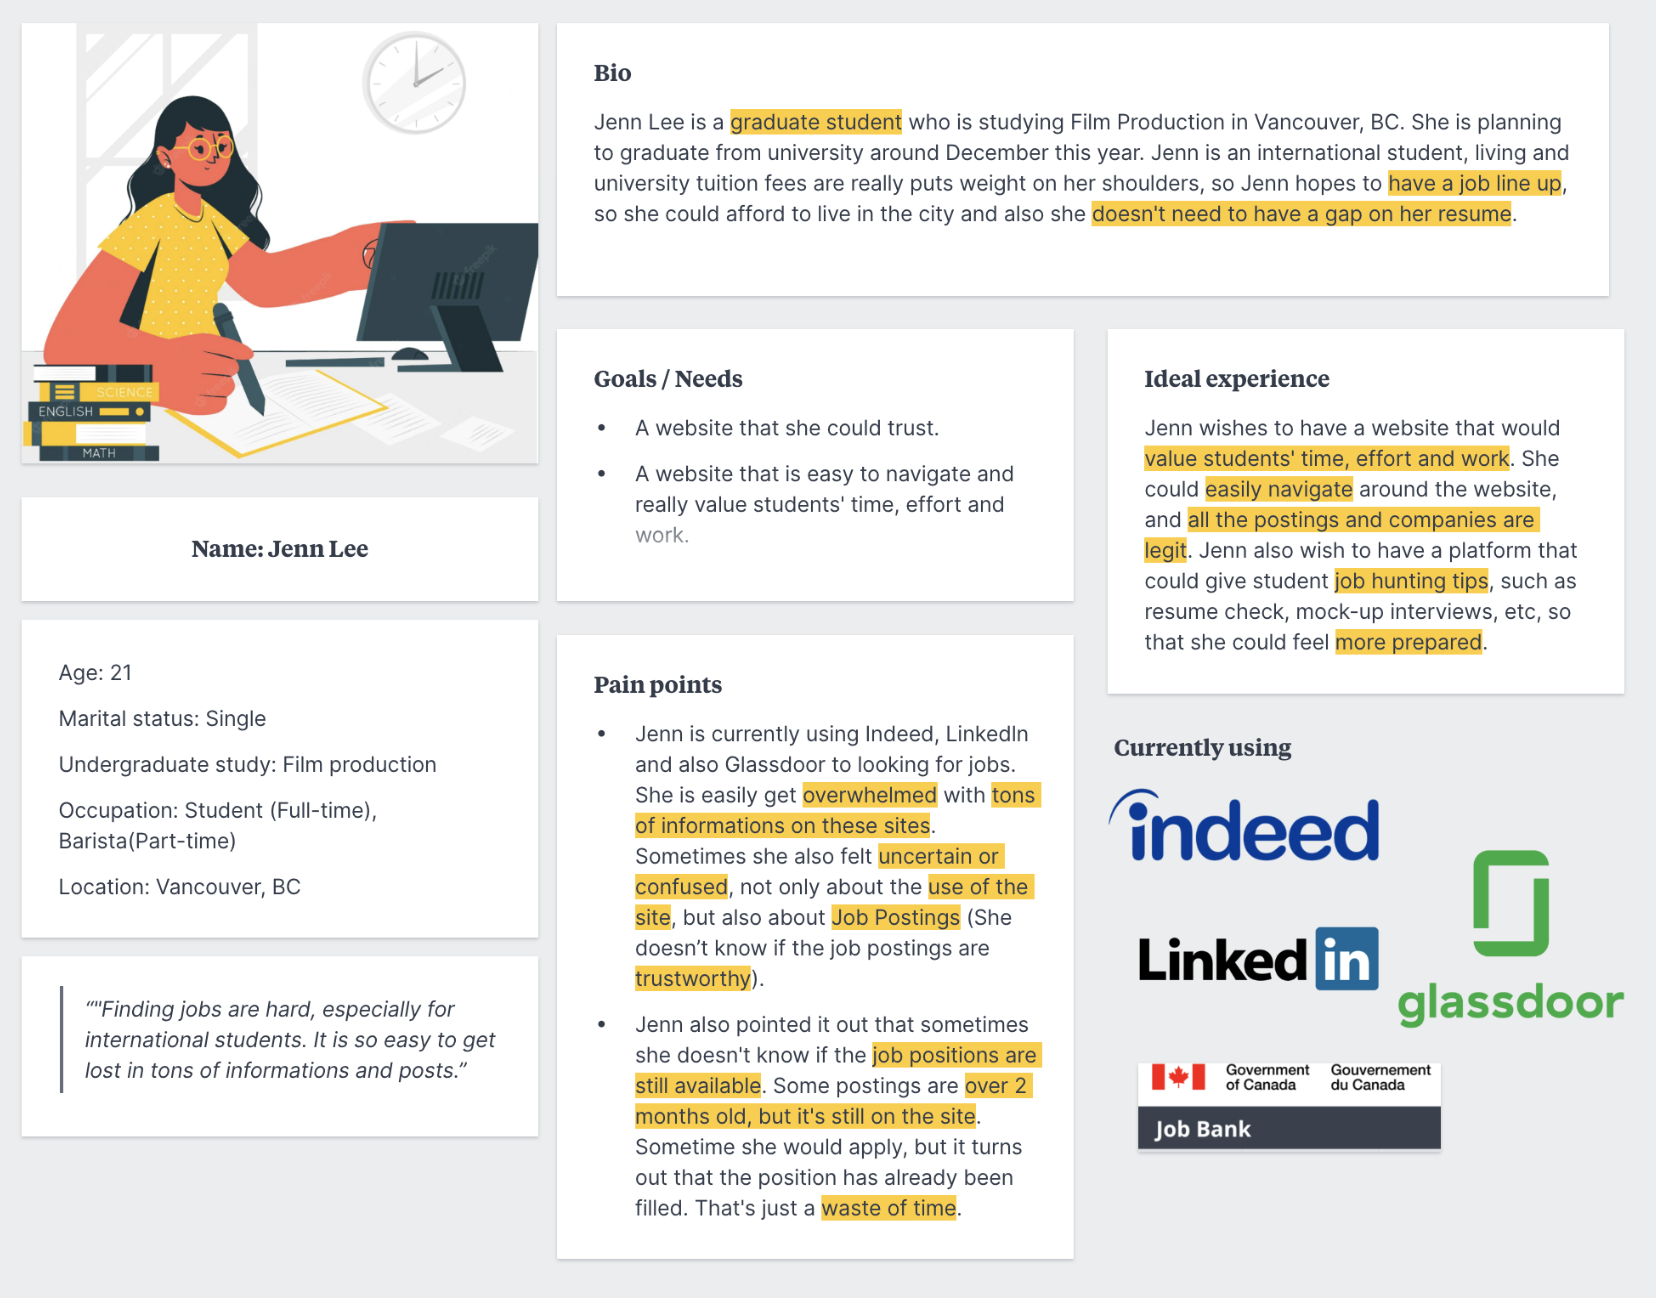
- Easy to follow is key:
The SWOT analysis and user interviews reveal a common theme: school websites are overloaded with information, causing 75% of users to feel overwhelmed and struggle to discern what truly matters. It's as if the websites are drowning in data, making it challenging for users to find their way.
- "Website is not enough":
While having a website for SOCA is essential, the real question is, how can we elevate it further? Users have some great ideas, such as hosting workshops, inviting student speakers to share their experiences, and offering mock classes for high schoolers. The challenge lies in figuring out how to effectively showcase these fantastic initiatives on our website. It's about finding the right balance and platform to bring these valuable offerings to the forefront, engaging and inspiring our audience.


4.
Explore
Next steps
Think of the Explore phase as the moment when we go from scratching our heads about what's going on and what users really want to getting all creative and cooking up some cool ideas. It's like laying the foundation before building a skyscraper. The Explore phase is about transitioning from understanding the problem and user needs to generating and refining potential solutions. It sets the stage for the subsequent phases of design, where I started creating prototypes, wireframes, and user interfaces based on the insights gained during exploration. It's a pivotal step in the user-centered design process, ensuring that design decisions are well-informed and aligned with the ultimate goal of delivering a great user experience.
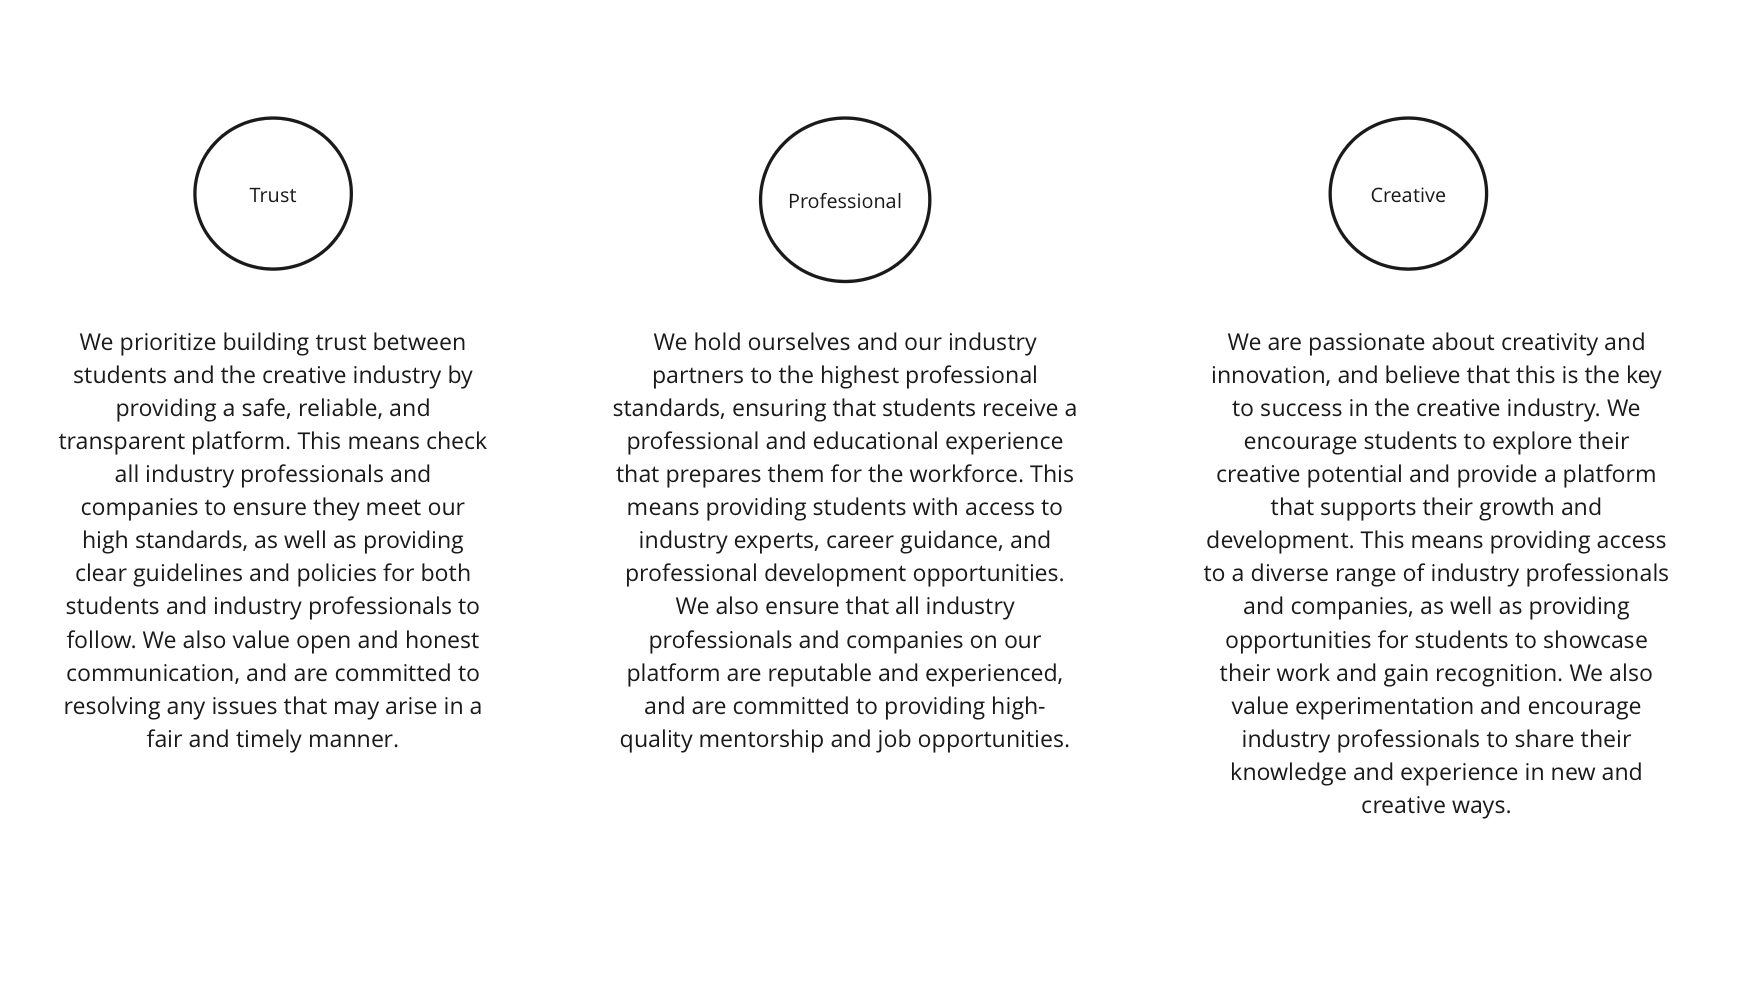
- Content structure
- Jobs to be done
- Experience principles
- Mental Model
- Site map
Explore
Next steps
Think of the Explore phase as the moment when we go from scratching our heads about what's going on and what users really want to getting all creative and cooking up some cool ideas. It's like laying the foundation before building a skyscraper. The Explore phase is about transitioning from understanding the problem and user needs to generating and refining potential solutions. It sets the stage for the subsequent phases of design, where I started creating prototypes, wireframes, and user interfaces based on the insights gained during exploration. It's a pivotal step in the user-centered design process, ensuring that design decisions are well-informed and aligned with the ultimate goal of delivering a great user experience.
- Content structure
- Jobs to be done
- Experience principles
- Mental Model
- Site map

︎Visualizing a User-Centric Experience ︎
UI Design
Step 1:
Sketches
- To start off the conversion about design needs and layout
- Helps to clarify and define features needed and change ideas quickly
- Helps visualize how screens might look on different device sizes and in different contexts
I like to start by sketching out a bunch of basic ideas to really explore the problem from every angle and brainstorm different solutions. When I'm doing these sketches, I'm all about creating as many different possibilities as I can.
At this stage, it's all about keeping things open-ended. I find that not getting too caught up in the nitty-gritty details is key. I want my mind to be free to come up with as many ideas as possible, so I can later sift through them and pick out the ones that seem the most promising.
This is when I touch base with my mentor and users to make sure I'm heading in the right direction. It's a great way to prevent unnecessary work down the road.
Step 2:
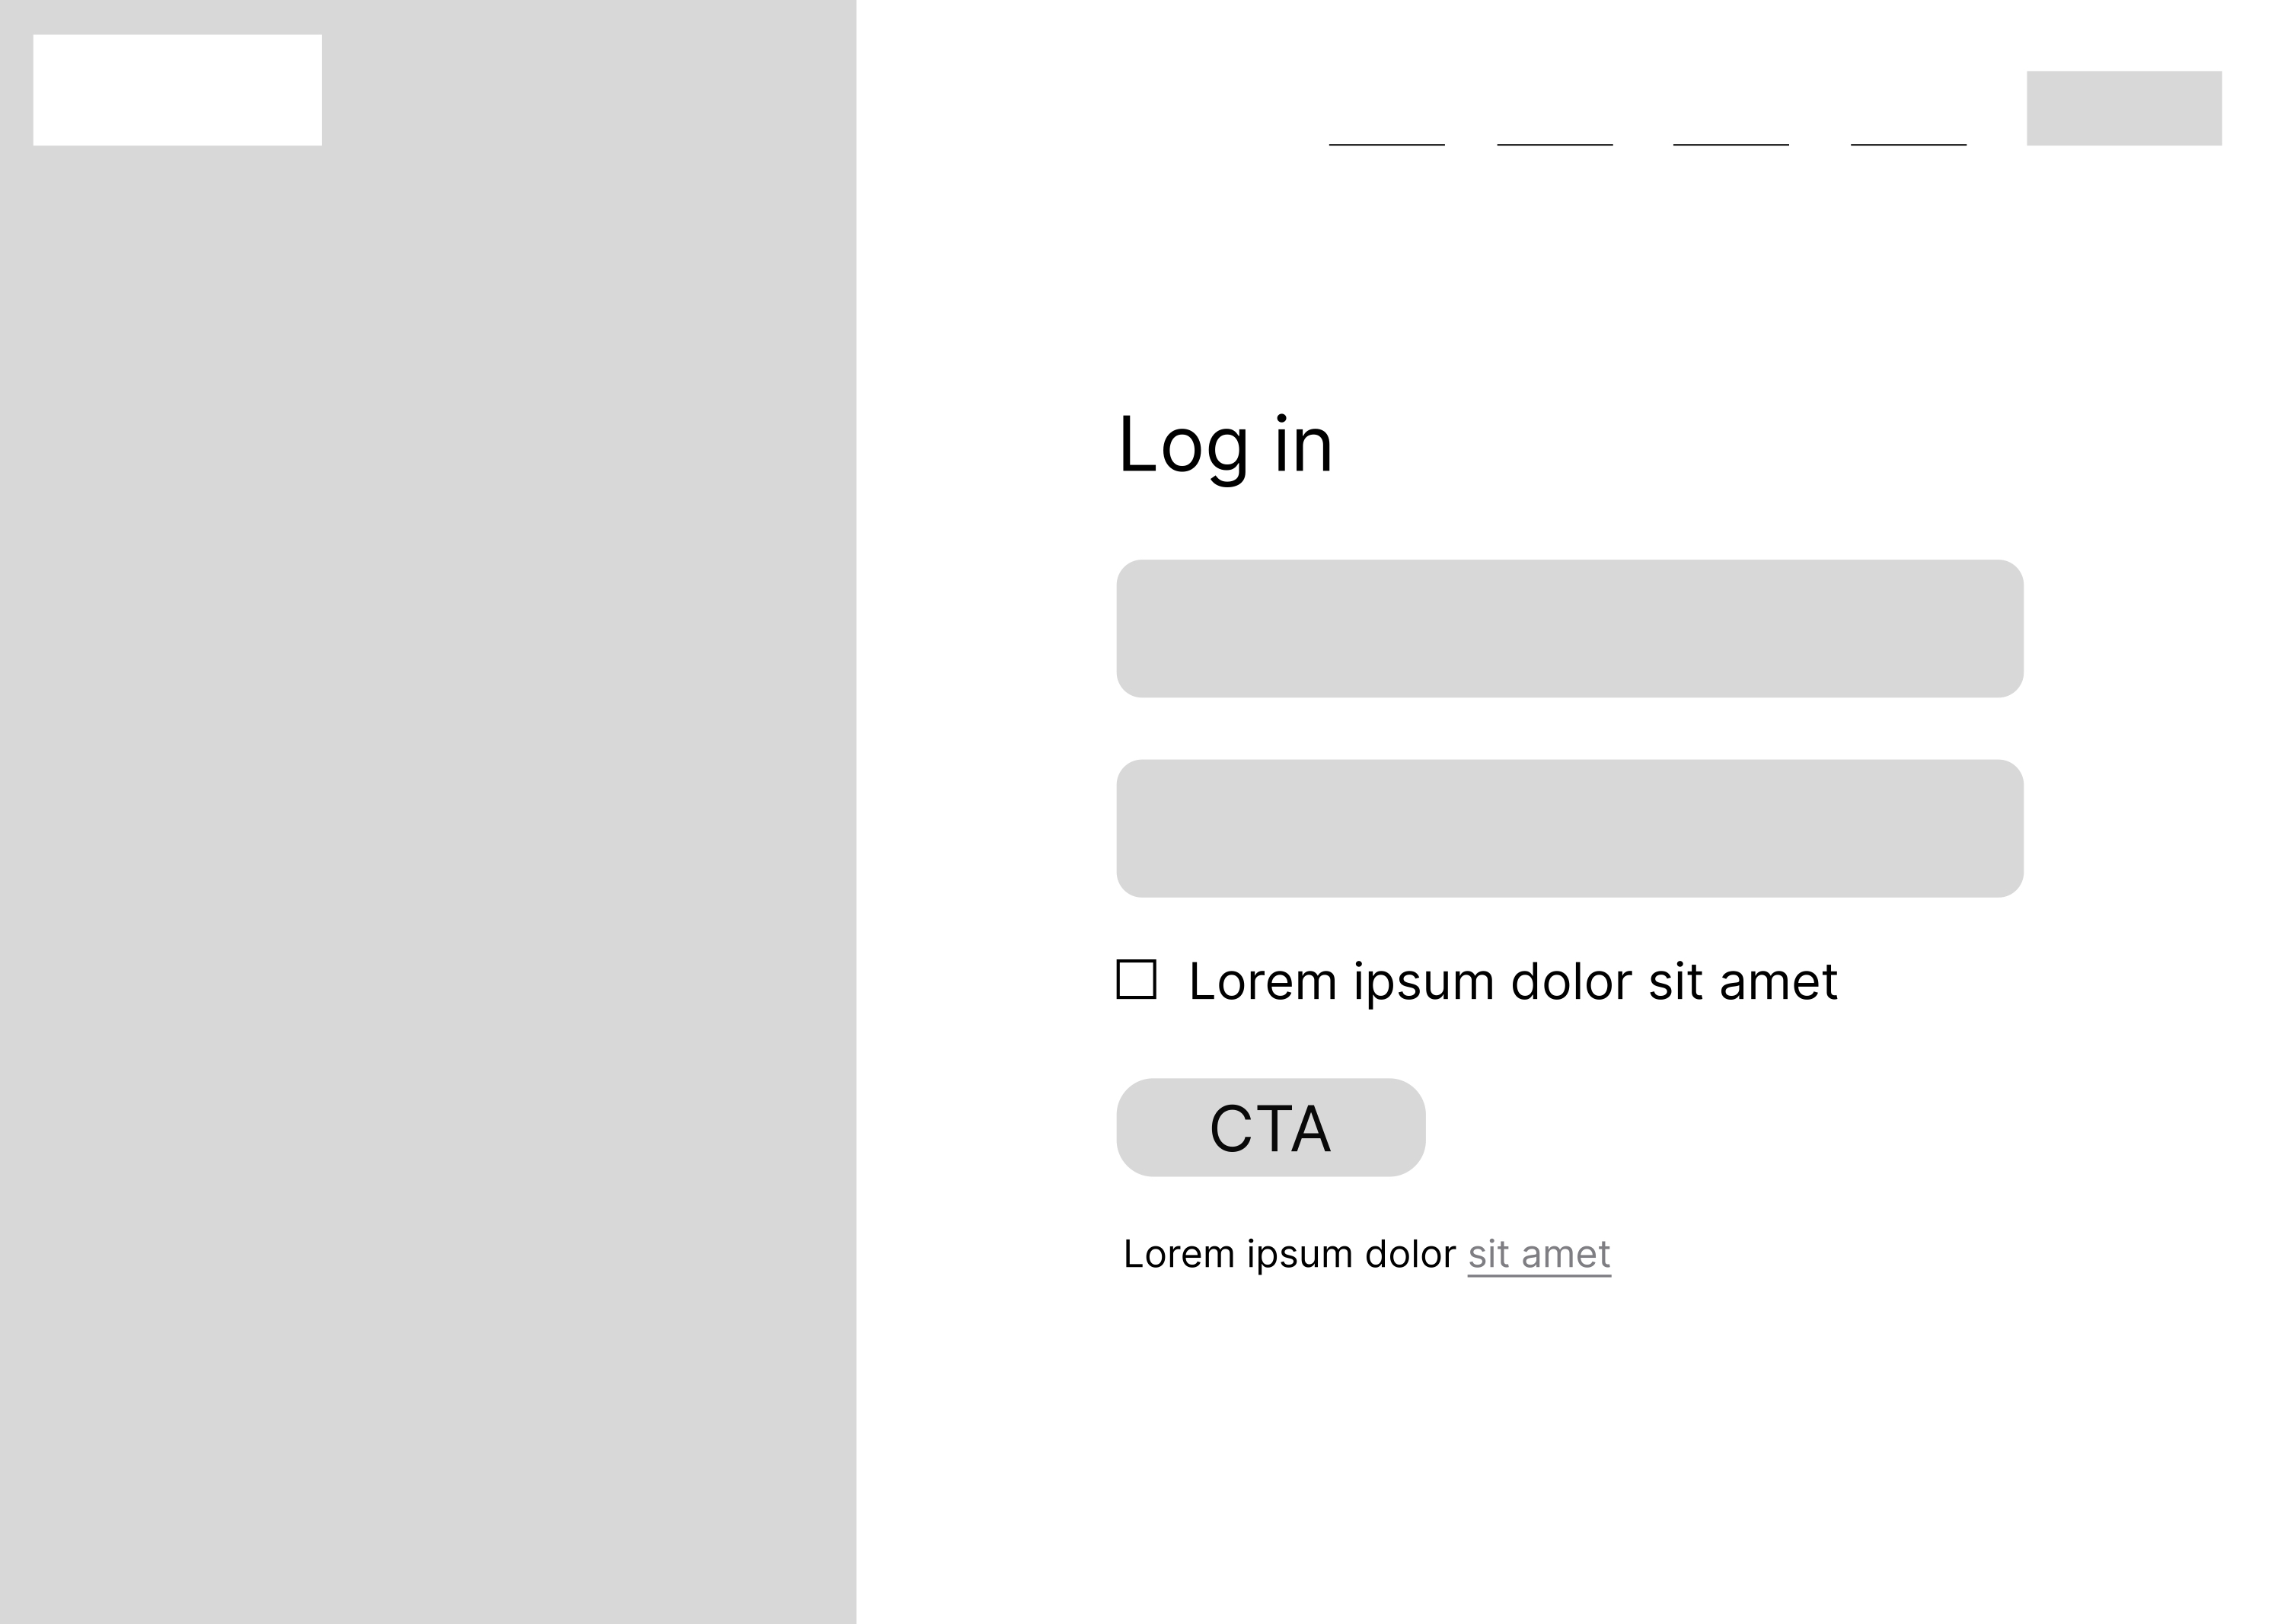
Wireframes or Gray boxing
Wireframes serve as a preview of how things will appear before we add the final visual design touches. This is where we begin to get a sense of the layout and the emerging elements.
- Establish correct proportions
- Build trust with stakeholders and help them see the idea more fleshed out
- Fast and cheap way to create initial ideas or to low-fidelity prototype
Tools used: Figma
Step 3:
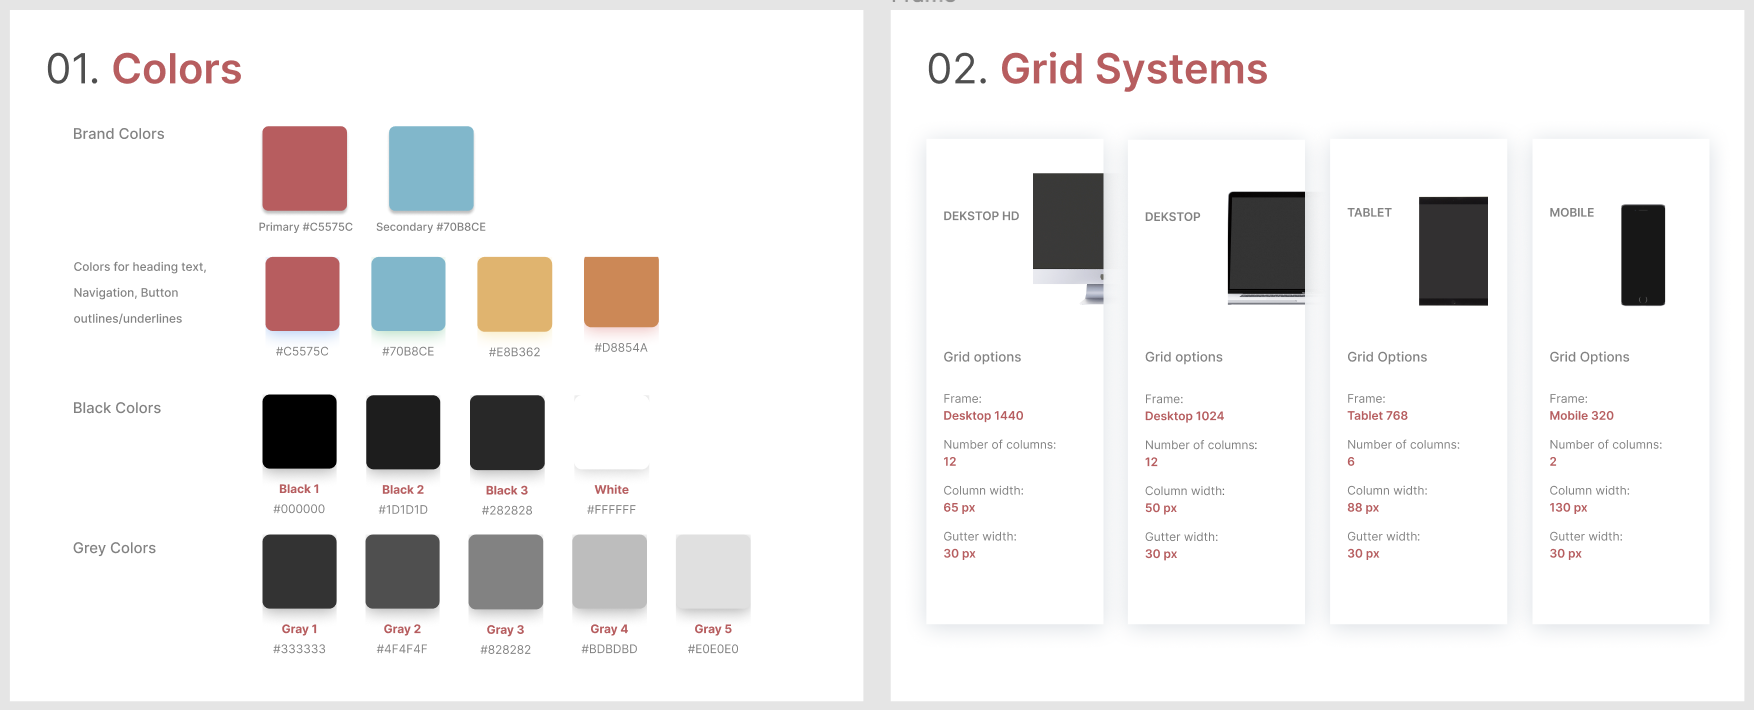
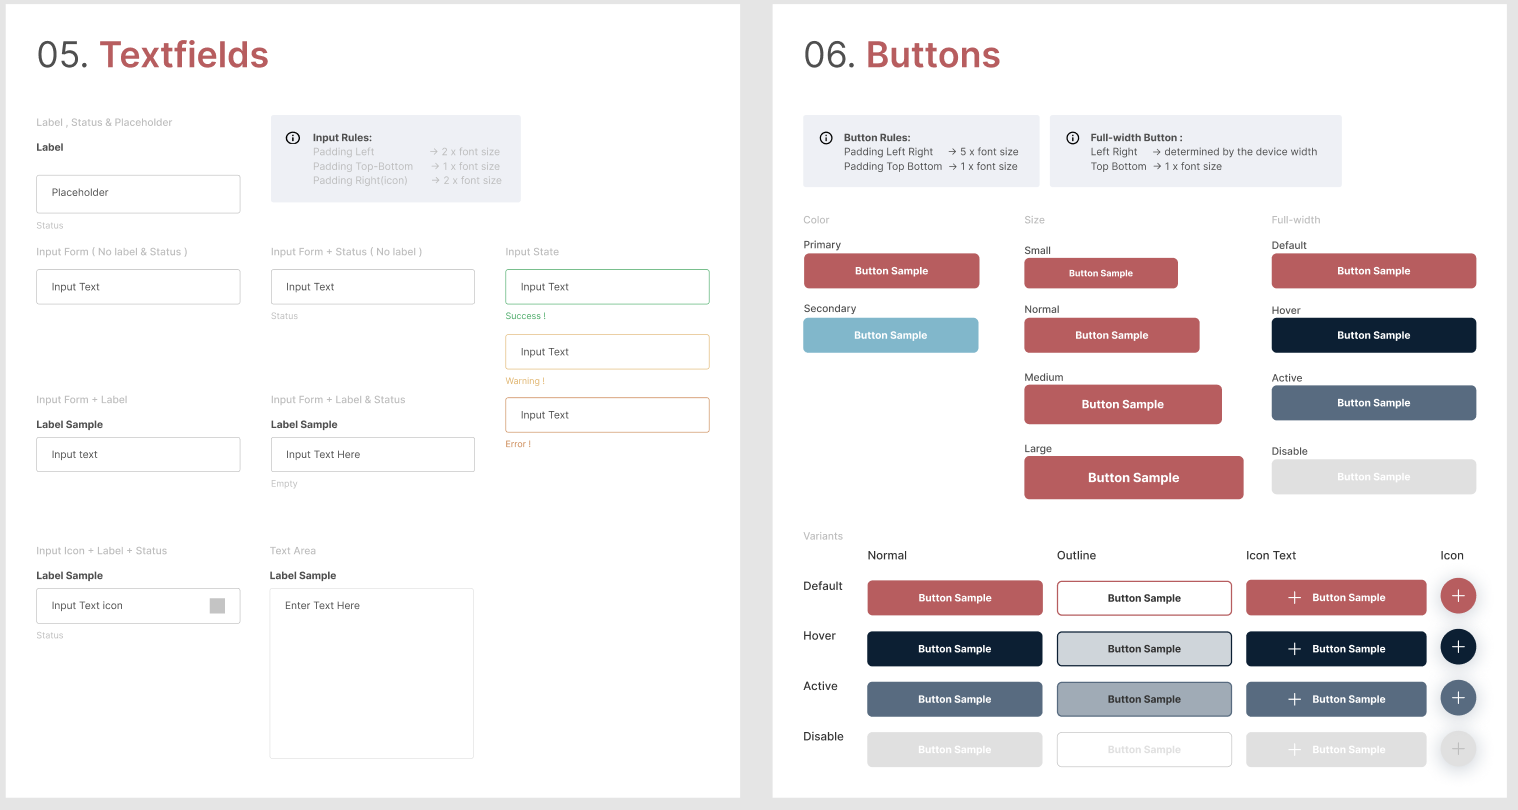
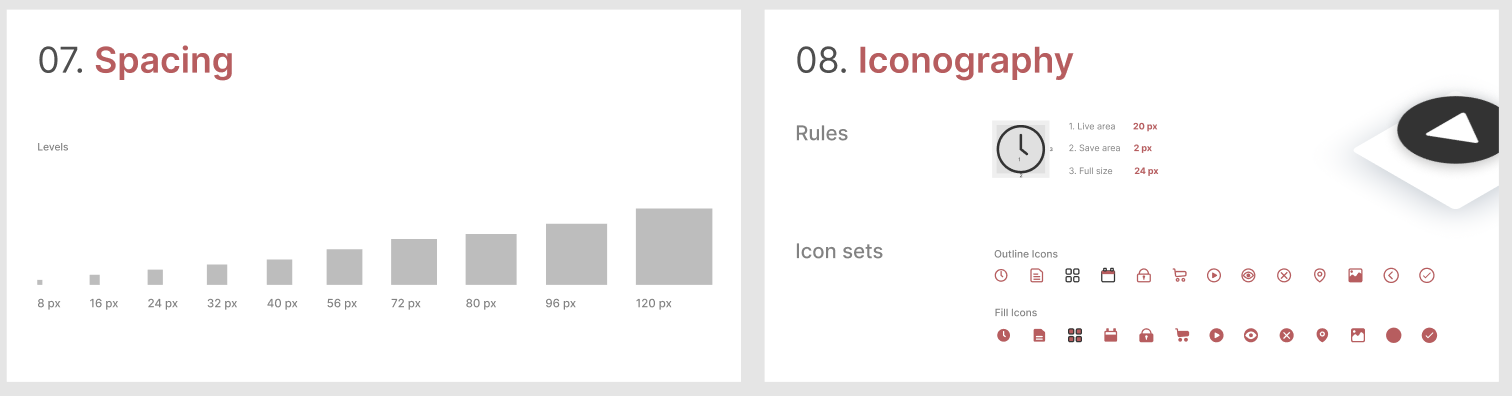
Visual design
It's time to craft a well-defined visual strategy, encompassing choices like selecting a fitting color palette, picking fonts and typefaces, and crafting a repository of visual elements consistent with the company's brand identity. Once the visual strategy is in place, you can progress from low-fidelity sketches to mid-fidelity designs while infusing them with branding and character.
This phase involves frequent iterations, with continuous sharing of designs among stakeholders and ongoingrefinements. After several rounds of feedback, you'll ultimately arrive at captivating static mockups that closely mirror the final product's appearance.
Wireframes or Gray boxing
Wireframes serve as a preview of how things will appear before we add the final visual design touches. This is where we begin to get a sense of the layout and the emerging elements.
“A wireframe is generally a monochromatic drawing that’s created in the design phase of Design Thinking Process. It provides a blueprint of the page structure, layout, information and functions. This in turn gives a clear idea to the stakeholders about the functioning and visual representation of application UI.”- Visualize the general layout
- Establish correct proportions
- Build trust with stakeholders and help them see the idea more fleshed out
- Fast and cheap way to create initial ideas or to low-fidelity prototype
Tools used: Figma
Step 3:
Visual design
It's time to craft a well-defined visual strategy, encompassing choices like selecting a fitting color palette, picking fonts and typefaces, and crafting a repository of visual elements consistent with the company's brand identity. Once the visual strategy is in place, you can progress from low-fidelity sketches to mid-fidelity designs while infusing them with branding and character.
This phase involves frequent iterations, with continuous sharing of designs among stakeholders and ongoingrefinements. After several rounds of feedback, you'll ultimately arrive at captivating static mockups that closely mirror the final product's appearance.


Step 4:
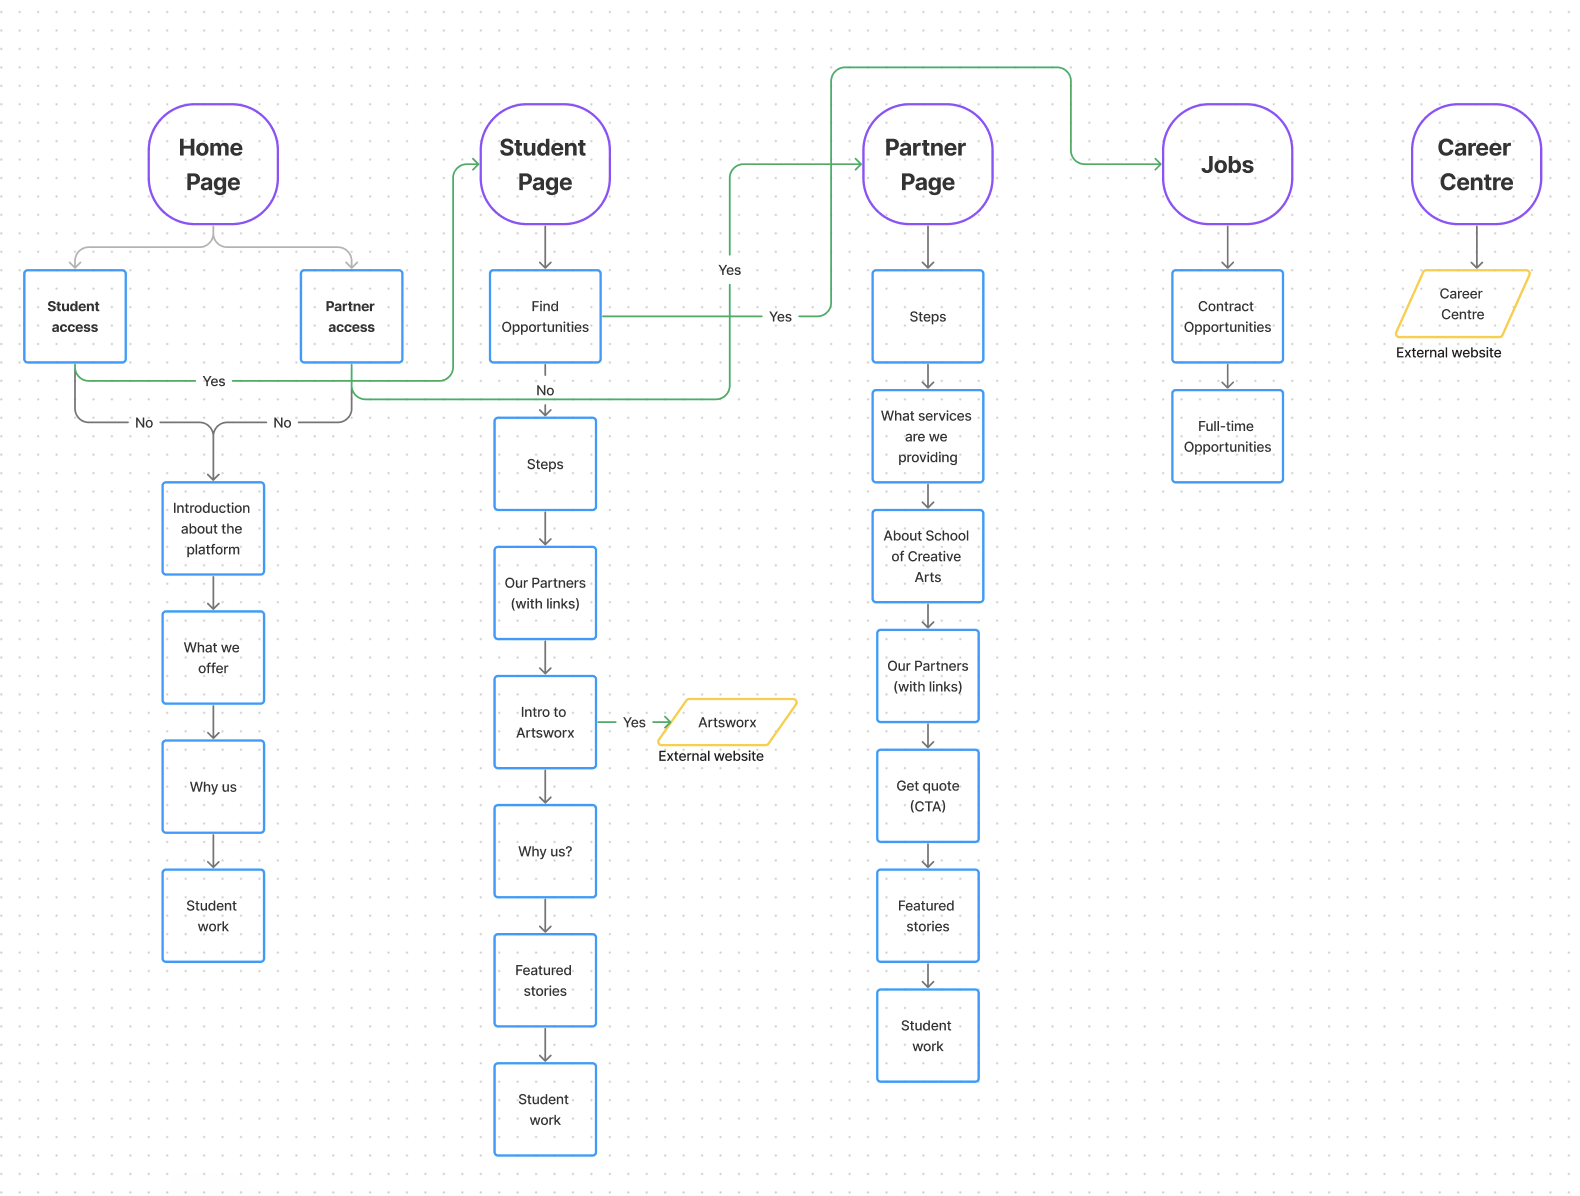
User flows and Task flows
A user flow is a visual representation or diagram that outlines the path a user follows through our website to accomplish a specific task or goal. User tasks are specific actions or goals that users want to achieve within an interface. They focus on the individual steps and interactions necessary to complete those actions.
- To show navigation routes
- To check for missing states and information
- To visualize entry, exist and decision points for your user/customer journey
Step 5:
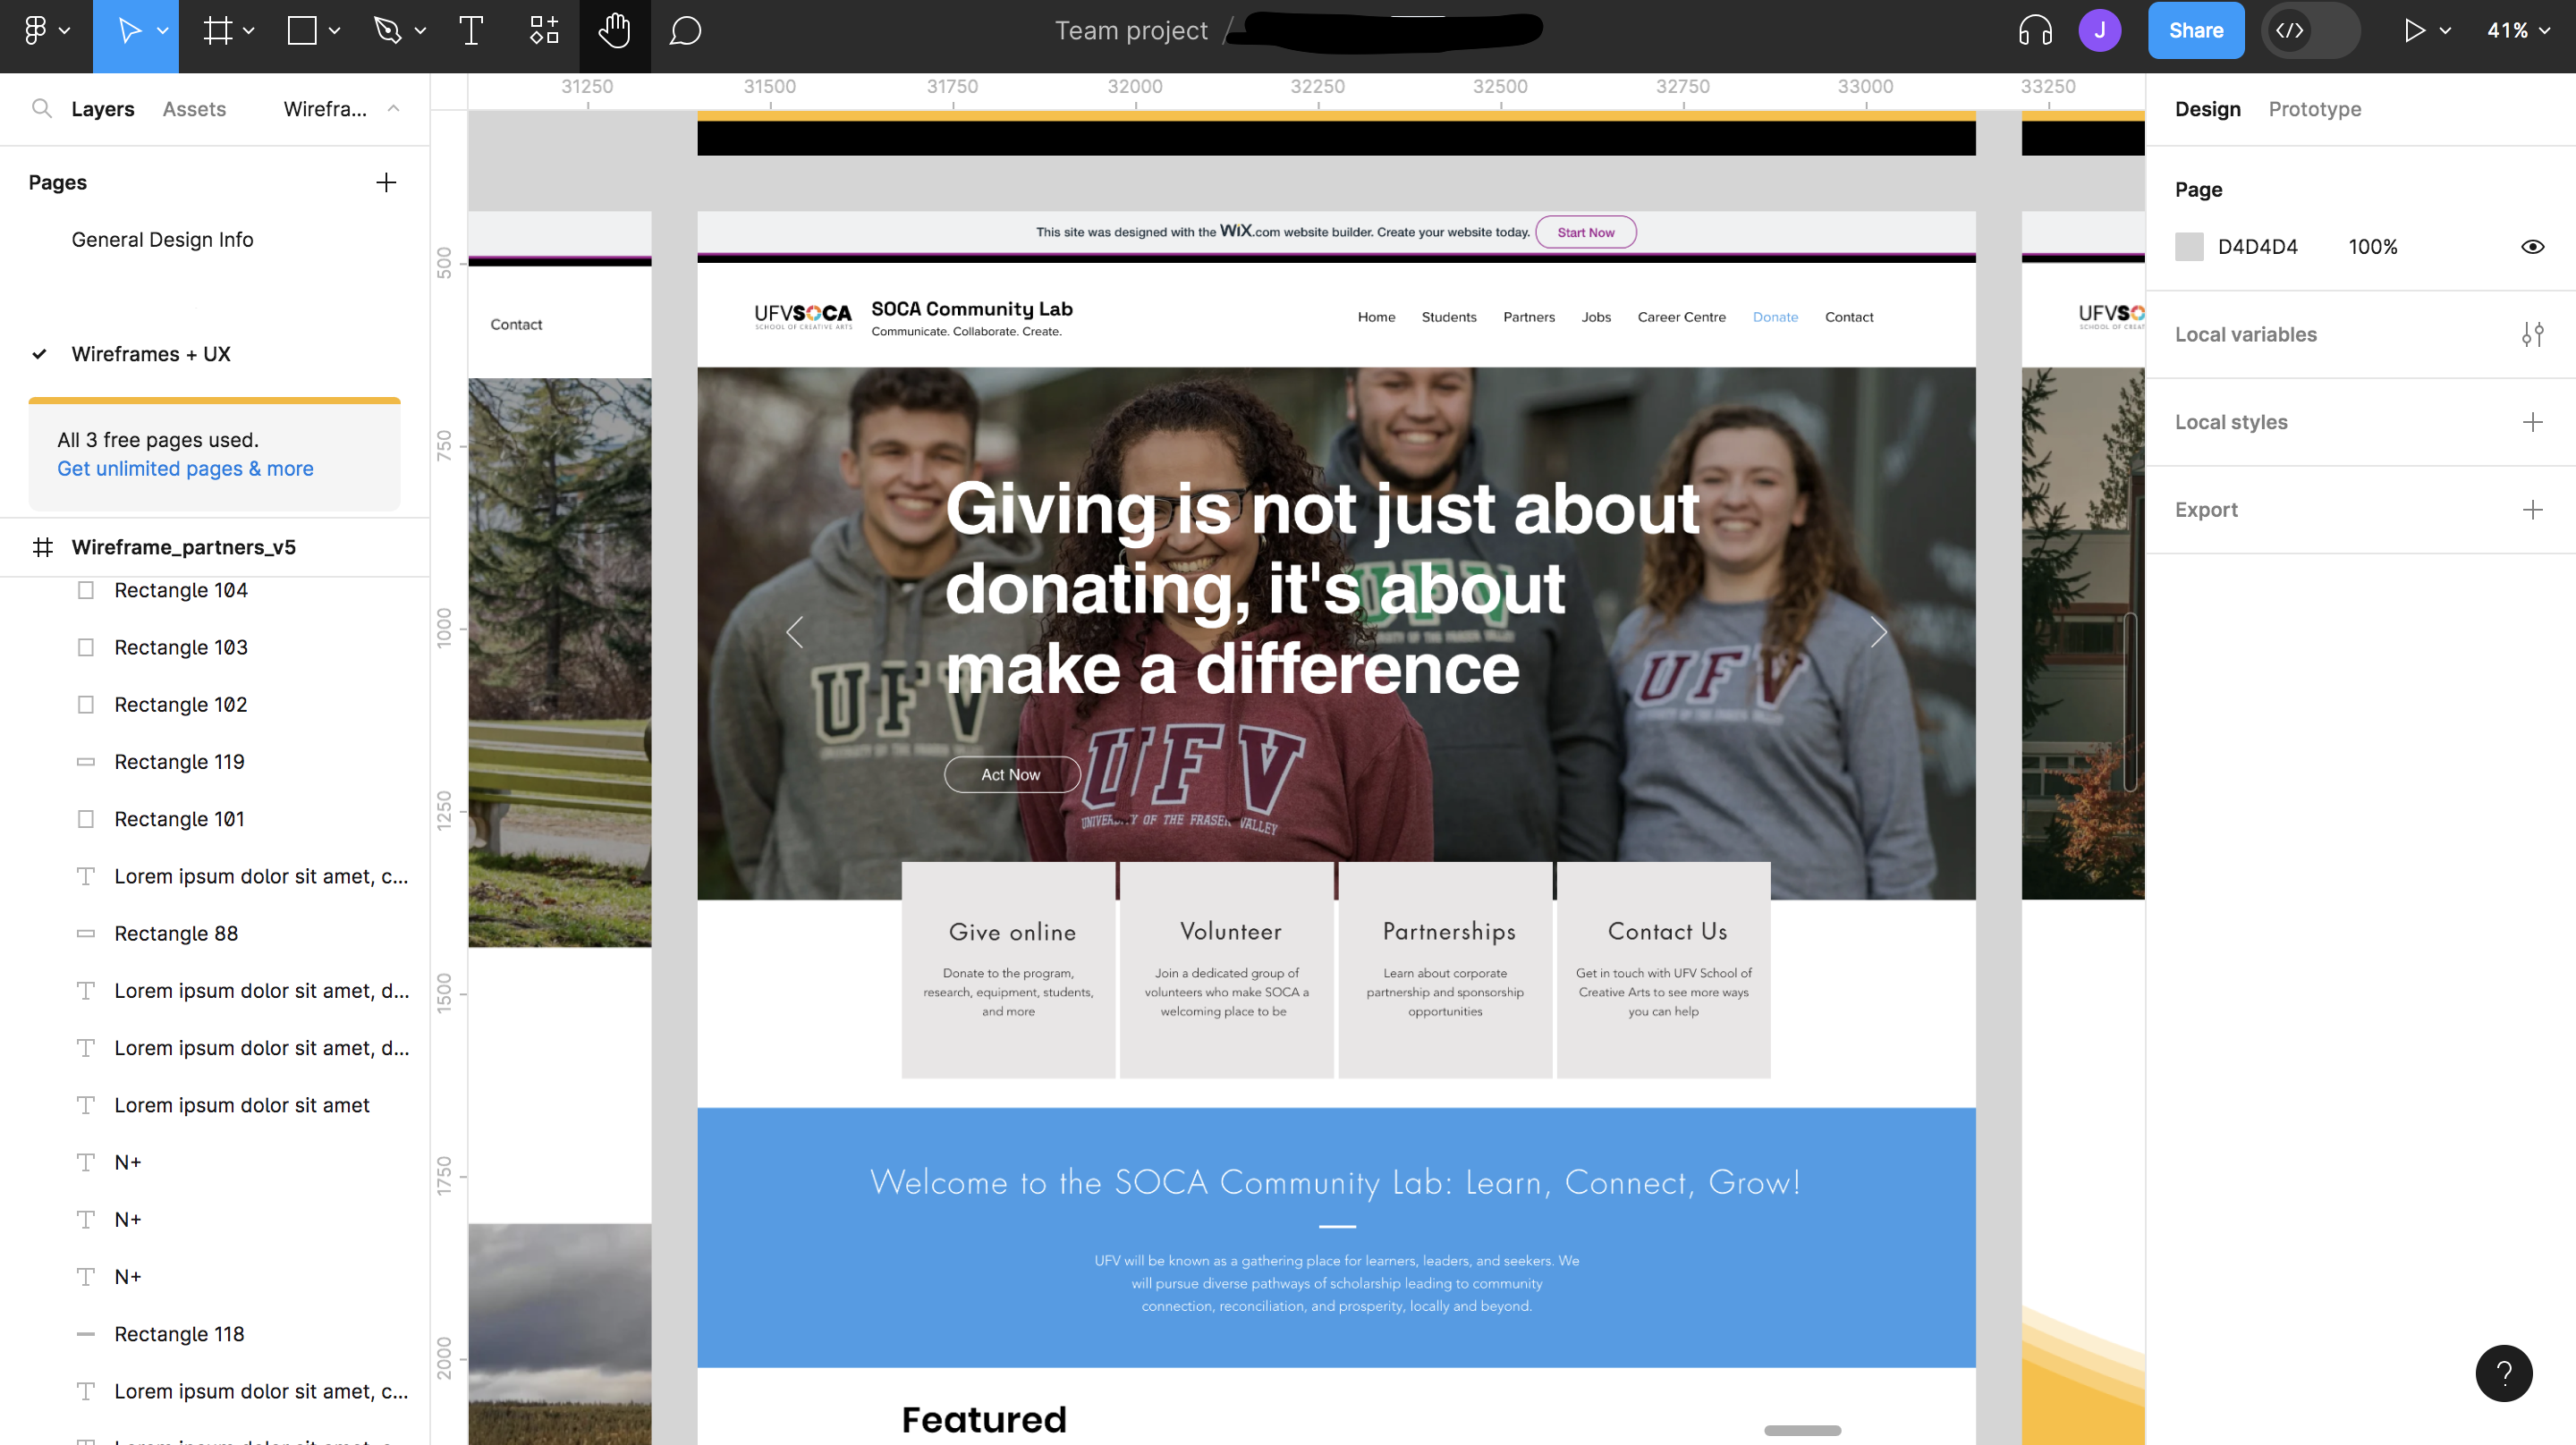
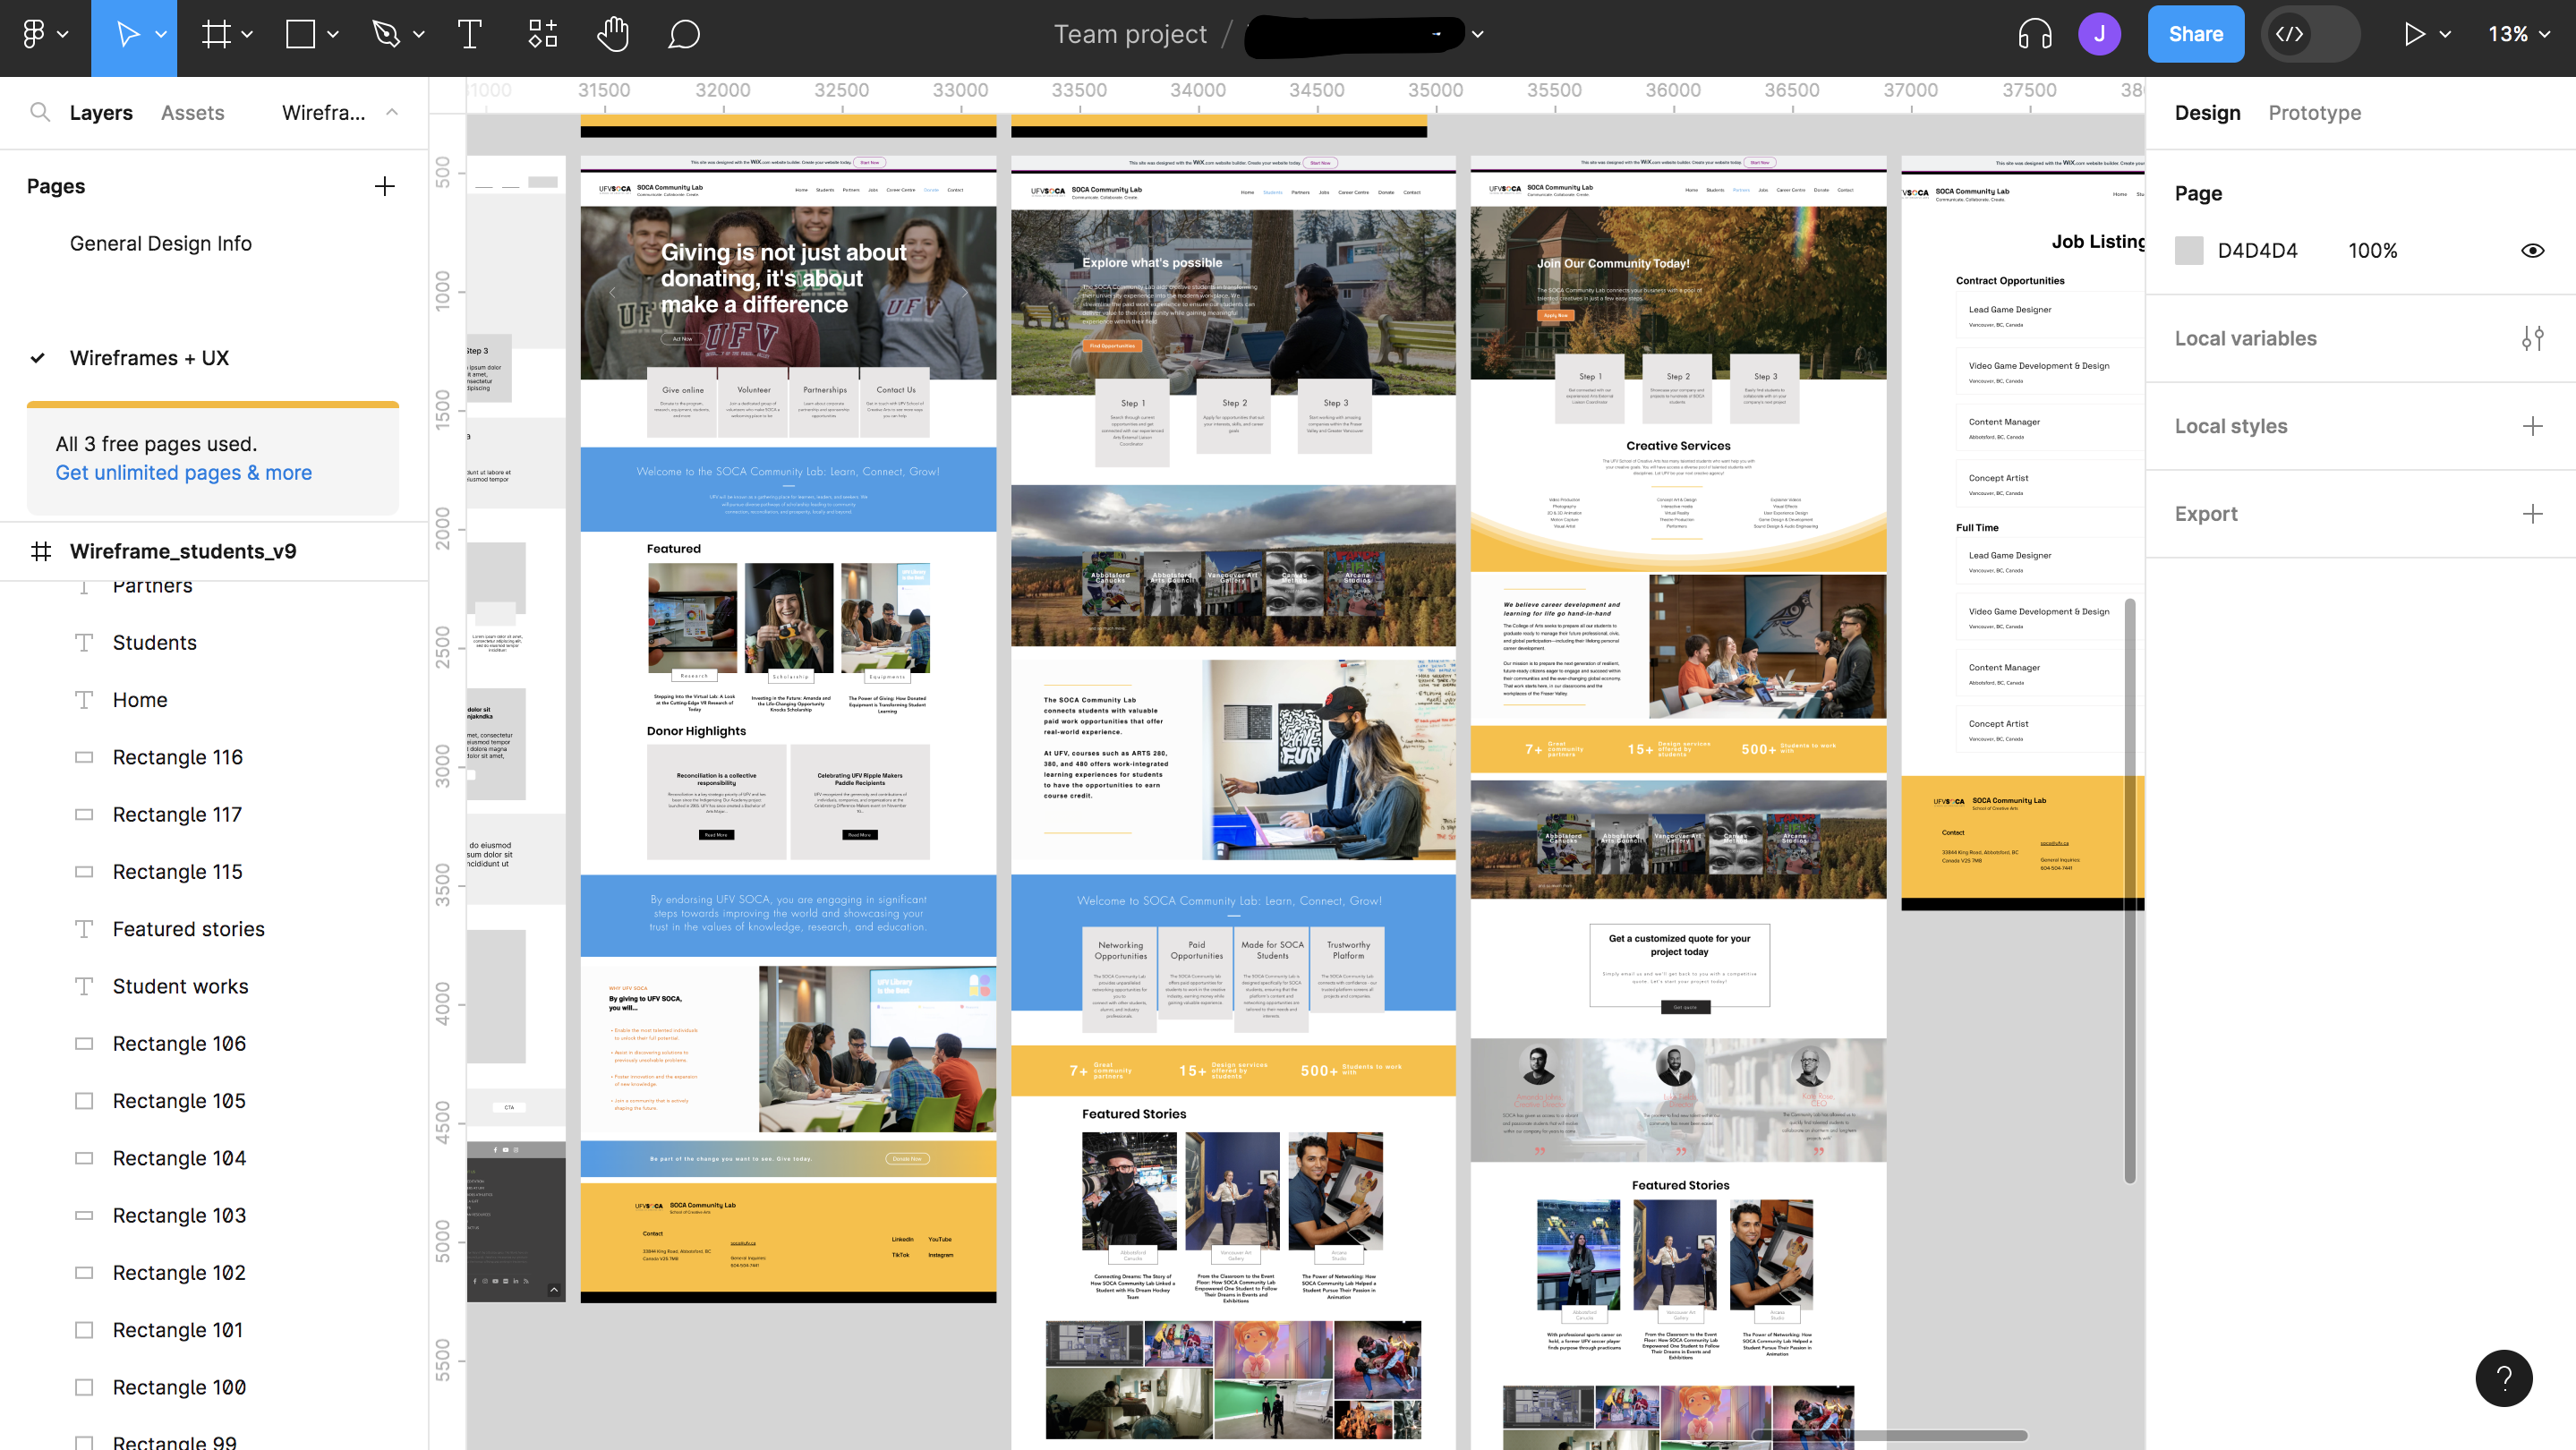
High fidelity designs
A high-fidelity wireframe in UI (User Interface) design is a detailed and polished representation of a user interface that closely resembles the final product in terms of visual design, layout, and functionality. While high-fidelity wireframes offer a highly detailed view of the UI, they are not the final product. They are an intermediate step in the design process, bridging the gap between conceptual design and actual development. Creating high-fidelity wireframes can be time-consuming, but they play a crucial role in refining and finalizing the user interface before implementation.
- Create pixel perfection
- Create visual design consistency
- Add a sense of your brand
- Select final design assets
- Get final approval from stakeholders
Step 6:
Prototype
Interactive prototypes for user interfaces (UI) are highly detailed and functional representations of a digital product or application that allow users to interact with the interface as if it were a real working system. These prototypes go beyond static images or wireframes by incorporating interactive elements and user flows, enabling users to click buttons, navigate between screens, input data, and experience the UI's behavior and functionality.
- Links together all of the screen and flows in a simulated environment
- Ensures that everything looks good, work well and flows as intended before it goes to production
- This can be considered the pre-code or no-code version of your product
Lessons Learned
- Effective Content Organization:
I found it challenging to figure out what should be front and center on our website—what our users want to see first. It's all about making sure the content on our site is well-organized, so it's user-friendly. People should have an easy time finding what they need and moving around without getting frustrated. Getting the hang of information architecture and content hierarchy has been a game-changer for making our site more user-friendly."
- Foundations of SEO:
Understanding the basics of search engine optimization (SEO) is a valuable lesson. Optimizing our website for search engines can improve its visibility and reach. This includes knowledge about keywords, meta tags, and content optimization to enhance our website's ranking on search engine results pages (SERPs).
- Visual Design:
Website design requires a good sense of visual design principles such as color theory, typography, spacing, and layout. I learned how to use these principles effectively to create a visually appealing application that engages and captivates the user.
- Testing and Continuous Iteration:
Testing and getting feedback from users are super important. I made a habit of regularly testing our website, sometimes with real users or by comparing different versions. It helped me spot the problems and areas where we could do better. The cool thing about it is that it's like a journey of constant improvement—our website keeps getting better and better.
video case study
Do not hesitate to contact me to discuss a possible project or learn more about my work.
open to work and collaboration open to work and collaboration open to work and collaboration